Google Slides now means that you can file a presentation with inset video out of your webcam. Every recording may be a most of half-hour prolonged. Not do you need to flip to a third-party system or internet meeting app, resembling Google Meet, to file a presentation. As a substitute, you may start and finish the obligation with nothing larger than Google Slides on a laptop computer pc.
As of March 2024, slide recordings may be made by purchasers who use Google Workspace Enterprise Normal or Plus; Enterprise Starter, Necessities, Necessities Plus, Normal or Plus; and Schooling Plus editions.
Easy methods to make a basic slide recording in Google Slides
To create a slide recording, you’ll need to use Google Chrome on a computer that has a digital digicam and microphone.
- Go to Google Slides and open your presentation.
- Choose the Rec button throughout the increased correct house, then select the Report new video button (Determine A).
The system will change to the show recording interface, with recording controls displayed underneath your slides. By default, the system will present your inset (picture-in-picture) video in medium dimension throughout the lower correct nook of a slide, since this portion of a slide is usually empty.
- Optionally, sooner than you start recording, you may regulate three settings:
-
-
- Modify the scenario of the inset (picture-in-picture) video physique (Determine B). Choose the inset location icon, found to the speedy correct of the forward slide (>) icon, to switch the scenario to be any of the corners or center house of a slide.

Determine B: Modify the default video inset location (lower correct) and dimension (medium) using the controls confirmed throughout the purple subject, or activate speaker notes with the icon indicated by the arrow. Picture: Andy Wolber/TechRepublic - Modify the scale of the inset video physique. Choose the scale icon, found to the suitable of the video inset location icon, then choose each a small, medium or big video physique dimension.
- Open speaker notes with the button found to the speedy left of the once more slide (<) icon. This may present speaker notes in your reference whereas recording. (Ideally, you wouldn’t need to consult with speaker notes, so that you could possibly probably in its place look immediately on the digital digicam as you file.)
- Modify the scenario of the inset (picture-in-picture) video physique (Determine B). Choose the inset location icon, found to the speedy correct of the forward slide (>) icon, to switch the scenario to be any of the corners or center house of a slide.
-
- If you is likely to be ready to file, select the large purple button on the bottom of the show.
- If prompted, it’s doable you’ll need to allow entry (Determine C) to the tab, along with the digital digicam and microphone. For example, when recording on a Chromebook, it’s doable you’ll be prompted to “Enable docs.google.com to see this tab?” and “Additionally allow tab audio.” Choose Enable, if prompted.
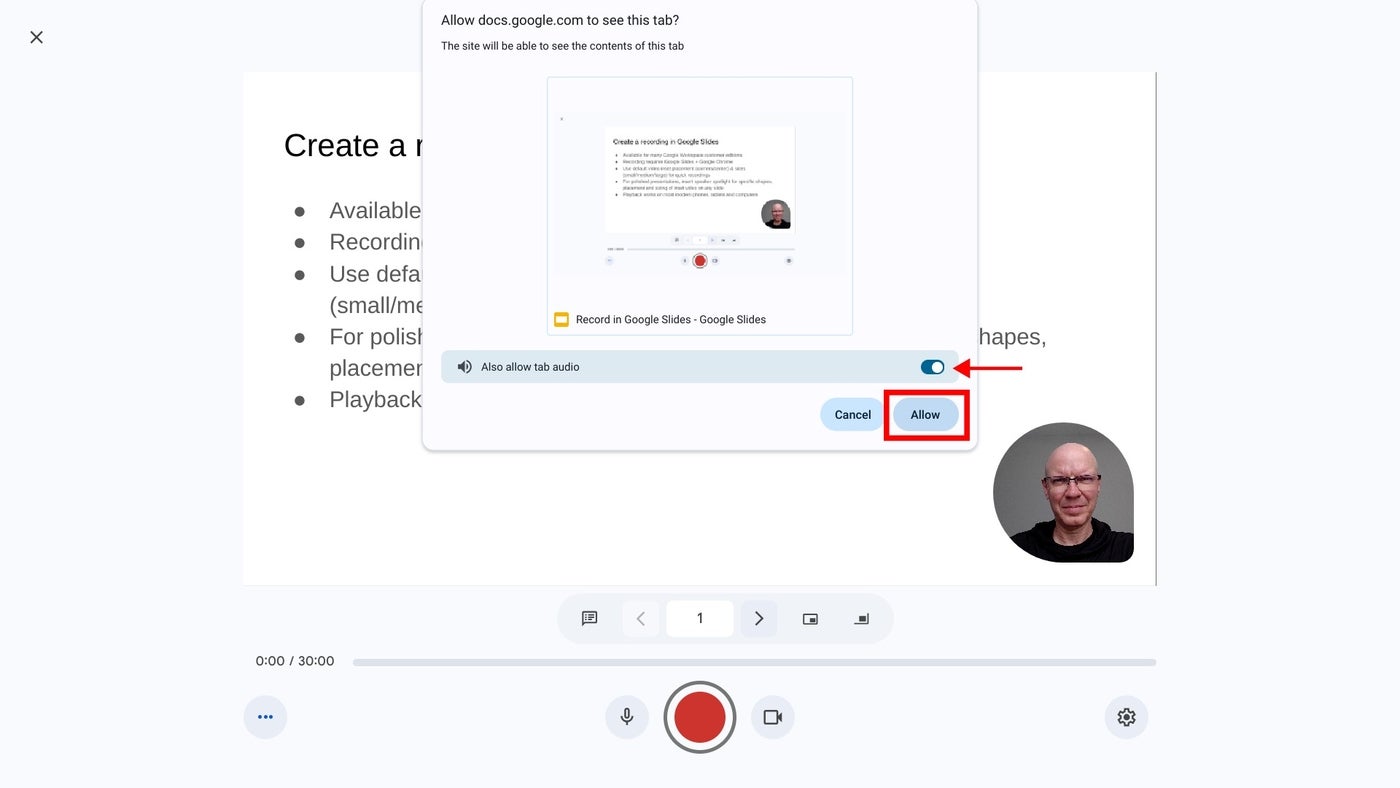
In just a few circumstances, it’s doable you’ll need to go to the subsequent hyperlinks in Chrome to manage permissions for:
-
-
- Digital camera: chrome://settings/content material materials/digital digicam.
- Microphone: chrome://settings/content material materials/microphone.
-
- A brief countdown ought to point out (i.e., 3, 2, 1), then your recording will begin. Report your video, advancing your slides as desired.
| Notice: Whereas annotation isn’t accessible all through any such recording, you could make it so that your cursor reveals. Simply toggle the cursor icon to the left of the file button in Determine A sooner than you begin! |
- To pause recording, press the large purple button on the bottom of the show.
- As soon as paused, it’s doable you’ll select from two decisions (Determine D):
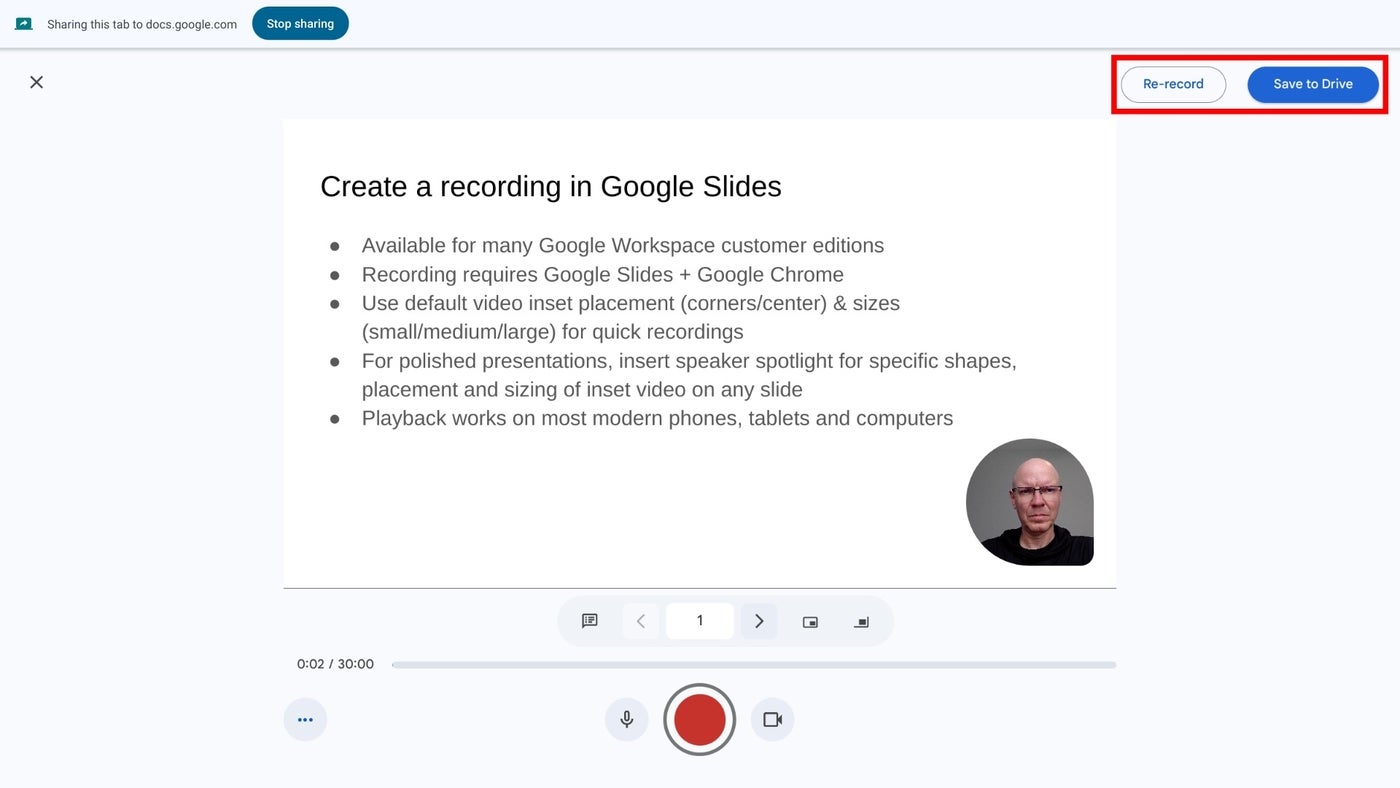
After you select Save to Drive, wait a bit until the system signifies the file has been saved. Should you enable or shut the tab too rapidly, it’s doable you’ll lose your recording.
How to decide on inset video shapes and sizes
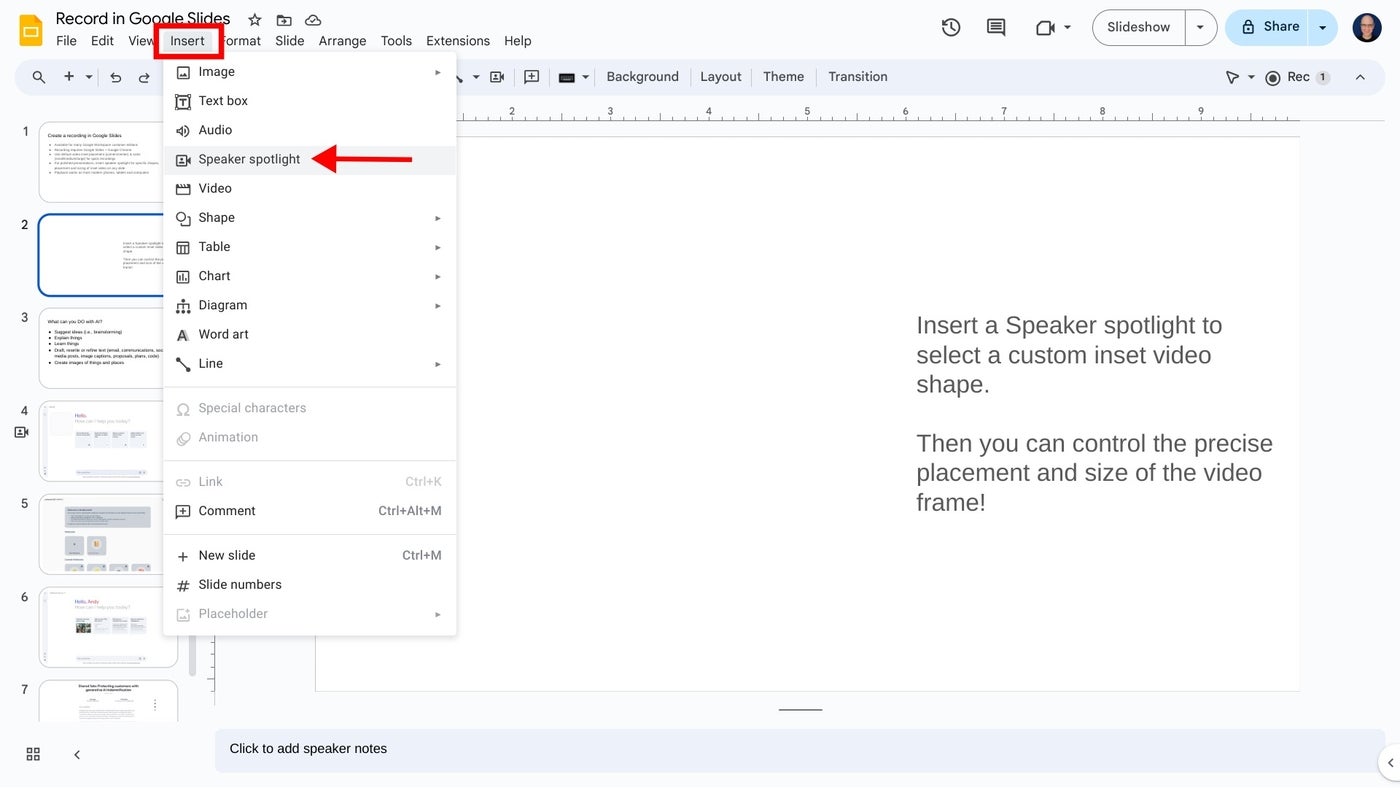
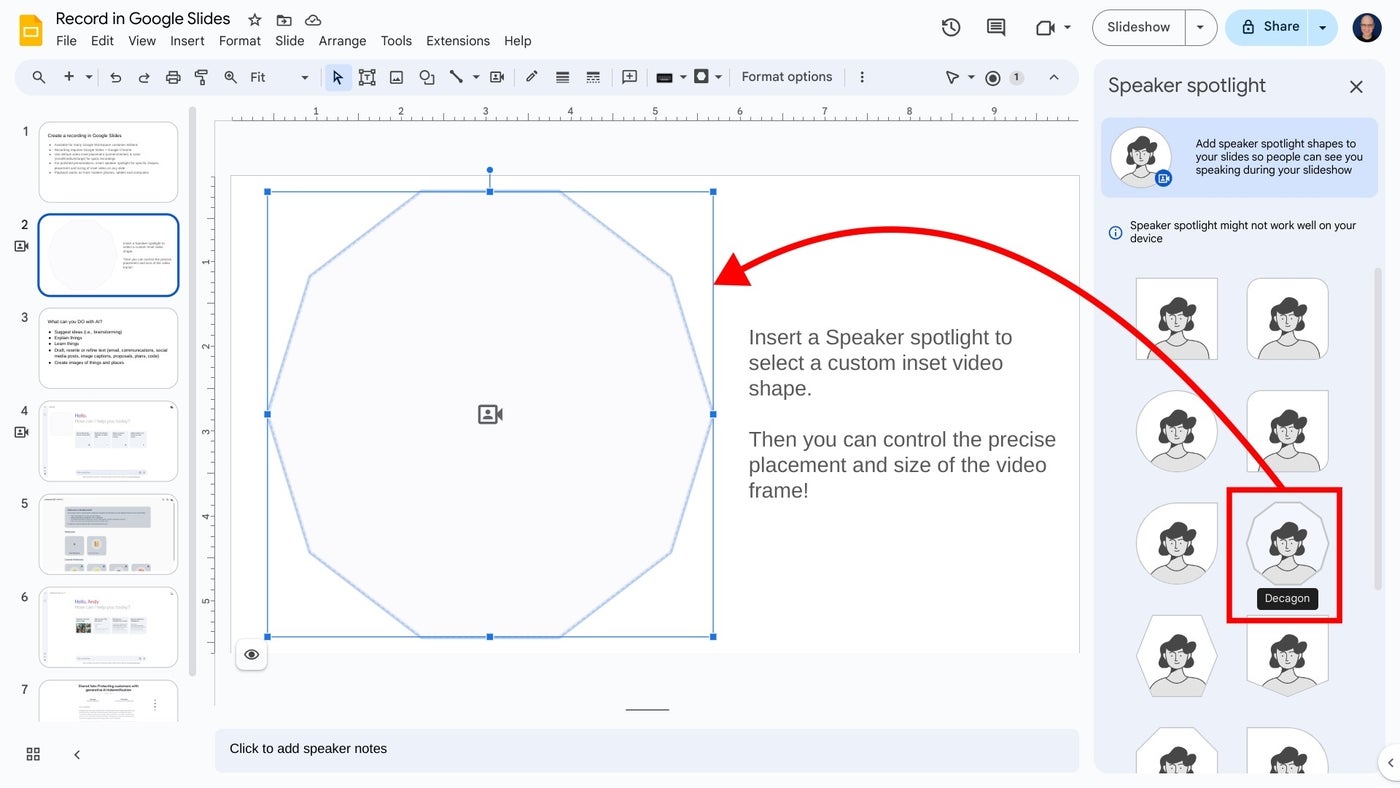
On any slide, it’s doable you’ll use the Insert | Speaker spotlight alternative (Determine E), then select a fashioned video physique. This inserts a physique the place the speaker video will present on that slide. You may reposition or resize the physique: Choose the shape, after which drag-and-drop it to switch it to a totally totally different place in your slide, or select a nook and drag it to resize it.
If you insert a speaker spotlight type, that supplants the place and dimension you may want chosen on a basic recording. In several phrases, the speaker’s video will present in one in every of many corners or the center, and throughout the small, medium or big type chosen with the settings — besides you’ve inserted a speaker spotlight type on an online web page (Determine F). Use the speaker spotlight option to convey in all probability essentially the most polished expert affect, as a result of it permits precise administration over the shape, dimension and placement of a video physique.
Easy methods to play, share and deal with slide recordings
You may entry slide recordings inside Google Slides on a computer. Nonetheless, in distinction to recording, which requires you to make use of Google Chrome, it’s doable you’ll entry and play present recordings inside Google Slides on quite a few fashionable browsers. For example, the subsequent steps all work for those who use Google Slides inside each Google Chrome or Apple’s Safari browser.
To entry recordings associated to a Google Slides presentation, observe these steps.
- Go to Google Slides and open your presentation.
- Choose the Rec button throughout the increased correct house. The recordings you’ve manufactured from the shows will present. Importantly, the system reveals every the date and interval of each recording.
- To view, share or receive a recording, click on on wherever on the playback icon or title of the recording (Determine G). It should open in a brand new tab. Inside this tab, you may:
-
- Choose the Play icon throughout the center of the video image to play the recording.
- Choose the Share button throughout the increased correct nook of the show to switch entry settings and supplies totally different people entry to the file.
- Choose the Obtain icon throughout the down arrow above a tray icon throughout the increased correct house of the show to acquire the file.

- Choose the three dot menu to the suitable of a listed recording to:
-
- Rename a file one factor aside from the default recording title.
- Take away a beforehand made recording you not need.
- Copy hyperlink and procure the Google Drive URL for the recorded file.
All Google Slides recordings are saved in a Slides recordings folder on Google Drive. The recordings are saved as .webm data, which is a extensively supported internet video format. You may merely open and play .webm data on every Apple and Android cell telephones. Any recordings you make using Google Slides should be easy to view on practically any system.
Does the facility to file a presentation inside Google Slides streamline your workflow? What sorts of video shows will you create with this new performance? Point out or message me on X (@awolber) to let me perceive the way you make the most of show recording inside Google Slides.
Data:
We’re proper right here to current Academic Information to Every and Each Learner for Free. Right here We’re to Present the Path in path of Their Aim. This put up is rewritten with Inspiration from the Techrepublic. Please click on on on the Supply Hyperlink to study the Important Publish
Contact us for Corrections or Elimination Requests
E mail: [email protected]
(Responds inside 2 Hours)”